The interior trim outlines a room and enhances its dimensions. Unintentional nicks and dents will be a distraction from the room’s special features. Keeping your interior trim looking like new can seem like a full time job. Damage to the base and casing is inevitable, often caused by simply vacuuming.
Whenever you are painting a door frame or wood base, the key to success is proper preparation; good tools and superior finish paint. Follow these steps to revitalize your interior wood trim for a beautiful lasting finish.
Important Steps When Painting Interior Trim
There are a few things to consider before starting and during the actual painting that will make this process faster. Plus, give better results.
- Clean to maximize adhesion.
- Identify your current type of finish.
- Protect adjacent surfaces from dust, paint drips or splatters.
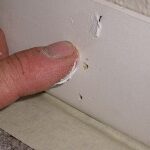
- Smooth the surface and properly repair chips, holes, dents and cracks. The finish paint will enhance all imperfections.
- Use masking materials to achieve a perfectly straight line and paint with confidence.
- Prime all raw or repaired areas.
- Choose the best finish paint.
- Thin, condition, the paint and maintain a wet edge to reduce brush marks.
- Properly use the brush for the best finish.
Tools and Materials List
You will need some provisions before starting to prepare or paint your interior trim. The list can be long if your interior wood trim is in desperate need of repairs or short if you are painting a small amount of wood base and casing that is in good shape. Good painting tools will make the preparation and finishing easier.
Painter’s Tool Kit
- Utility knife.
- Scrub pad and plastic pail.
- Clean rags.
- Putty knife.
- Small 1 inch paint scraper.
- 5-way or 11-in-1 multipurpose knife.
- Good dripless caulking gun.
- Sanding pad or sanding block. Medium-Fine grit sanding block is the most versatile.
- Dust mask and eye protection.
- Rubber gloves.
- Masking machine.
- High quality brushes. 1-1/2 inch angled sash brush for crisp sharp lines and 2 or 2-1/2 inch square edge brush for painting flat areas.
Materials (Painting Sundries)
- TSP, trisodium phosphate, solution.
- Masking paper and blue painter’s masking tape.
- Lightweight plastic.
- 80-grit and 120-grit sandpaper.
- Siliconized Acrylic caulk.
- Wood filler and lightweight spackling paste.
- Denatured alcohol.
- Deglosser, Paso.
- Oil based stain blocking primer.
- Finish paint, Alkyd or Acrylic enamel.
Preparation
The first step when painting interior trim is a good cleaning. This applies to paint that is in good condition or areas that might be excessively dirty and greasy. A clean surface will maximize the paints adhesion. Cleaning can be done later if the paint is peeling, cracked or otherwise in need of sanding.
An excellent product for cleaning interior trim prior to painting is , otherwise known as trisodium phosphate. This is a powerful grease cutter and can harm other unpaintable surfaces. Read the manufactures label carefully.
The same cleaning techniques as when cleaning walls prior to painting is applied to the interior trim, start at the bottom and work your way up. Rinse everything very well and allow to fully dry. Typically 2-4 hours before proceeding.
Another technique is to use a deglosser such as Paso. Paso is an excellent product that will clean the surface and dull the sheen. Mainly used on trim that is in good shape and requires minimal preparation.
Covering and Masking
The extent of covering and masking depends on the amount of sanding and your expertise with a brush.
If a lot of scraping and sanding is needed, make sure to cover all furniture with lightweight plastic and the floors with . If your needs are minimal use a drop cloth where you are working. A runner, 3 feet wide, is all you need. Masking paper can be used around the bottom of door frames or anywhere you need some extra protection.
Floors can be protected with masking tape and paper to prevent drips and splatters. This will speed-up your brushing when painting the base trim.
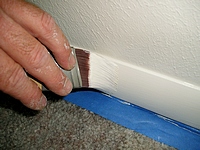
 A trick to protect carpet when painting base trim is to use wide masking tape. Apply the tape by overlapping it on the base then pushing the tape down and under the base. This takes some practice, but you won’t have to worry about the carpet when priming or painting.
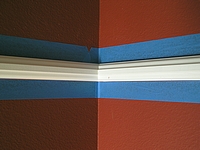
To obtain a straight edge while brushing the edges of your interior trim use blue painter’s tape along the wall. Apply around door frames and window frames or the top of base at the wall. Seal these edges firmly with your fingers.
Remove All Loose Paint and Caulking
When paint looses its bond on the underlying paint layers or wood beneath it the result may be an array of cracks called alligatoring or a bubbled surface called blistering.
Removing this damaged paint is critical, but homes built before the 1970’s can have lead in the paint layers on your interior trim. The old paint can be tested with a Lead Test Kit available at your local paint store. Protective clothing and a respirator should be worn during any scraping or sanding.
To smooth a damaged surface, first use a paint scraper or stiff putty knife and scrape away all the loose paint. Work with care and try not to cause any deep scratches or gouge the surface. Any additional damage will need to be repaired after sanding.
Loose caulking can be removed using the sharp tip of a 5-way or other multipurpose putty knife. Scrape and cut away any caulking that has lost its grip. Paint that is fully adhered can remain. All ruff and raised areas will need to be sanded before proceeding.
Paint Sanding
You have two options when sanding paint, use a power sander or manual sanding. A palm sander is great for wide flat areas but won’t work very well on delicate recessed areas. Use both sand paper and sanding sponges on hard to sand interior wood trim.
Repairing Interior Trim
 Damaged interior wood trim will need repair after the initial sanding. Before wood filler can be applied prime the damaged area with a high quality, fast drying, oil based primer. Allow to dry. This can take up to 24 hours depending on brand. The primer will maximize the fillers adhesion.
Start with 80-grit to cut down the ruff paint edges and level the surface. Follow this initial sanding with 120-grit paper or medium-fine sanding sponges. The deep groves left by the ruff sanding will have to be removed with finer sanding paper.
Lightly cracked paint on the interior trim can be sanded with 120-grit sand paper or a medium sanding sponge. If the areas are still ruff after using 120-grit continue sanding using 150-grit.
There are many types and brands of wood fillers on the market. The options are two-component repair compounds, example Bondo, wood dough and spackling paste. Two-component compounds and wood dough dry very hard and fast. Although difficult to sand when cured they offer a permanent repair. Spackling paste is the easiest to use and the popular choice but will not provide the same level of performance.
After all repairs are finished, caulk any gaps at the wall or between two adjoining pieces of interior trim. Use a damp soft rag wrapped around a finger to smooth the caulking.
Priming Repaired Interior Trim
Primer must be applied to the repaired areas before applying the finish paint. The entire surface of the interior wood trim can be primed with oil base enamel under coater. Many quick drying, stain blocking, oil base primers sand easily and work very well.
After a full priming lightly sand the interior trim to produce a smooth surface. Remove the dust with a shop vacuum and tack rags.
Identify Your Current Finish
Before any painting can take place you need to identify the type of finish that is on your interior trim. The reasons are that Latex or Acrylic paints won’t adhere to oil base paints very well even after sanding.
To test whether your interior trim is painted with an oil base or water based paint use denatured alcohol and a soft rag. Saturate a small section of the rag and lightly rub the paint on the interior trim. Use a white rag for checking dark colors and a dark rag for light colors. If any finish is softened or on the rag it is Latex or Acrylic, oil base products are not affected by denatured alcohol.
Choose the Best Finish Paint and Properly Thin
The primary choices for a finish for use on your interior trim are Acrylic and Alkyd. Both have great attributes and some weaknesses. Alkyd, oil base, enamel paints cure very hard and flow very well on the surface. This produces a smooth finish with just a few brush marks that is resistant to scratches.
Unfortunately oil base finishes dry and cure slowly, often taking a month for a truly hard surface. Plus it is more likely to be damaged by water and sunlight.
Acrylic, latex, enamel paints are easy to use and dry quickly. This allows you to use a room as soon as possible, plus there is no solvent smell. Add to this list UV stability and clean up with water. The main drawback is brush marks. Acrylic paint doesn’t flow like oil base.
Most enamel paints will need to be thinned or conditioned for brushing.
Special products are available to allow better flowing on the surface without compromising the quality of the paint. These products are much better than using water for acrylic/latex or mineral spirits for alkyd/oil base paints.
The following mixing instructions are for your reference. Always follow the manufactures instructions.
- Use Flotrol for water base paints and Penitrol for oil base paint.
- Mix small amounts of paint at a time, 1-1/2—2 inches of paint in a clean 1 gallon bucket.
- Add small amounts of the paint conditioner at a time; example is 2-3 tablespoons.
Test on a small piece of interior trim before proceeding and write down the amount used for future reference.
Properly Apply the Paint
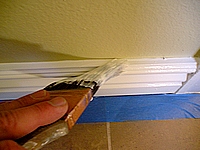
 Begin painting the interior trim closest to the ceiling and work your way to the base. Paint door and window frames before the baseboards. For the best results use a 1-1/2 angled brush on narrow trim and 2 inch or larger flat brush on wide areas such as large baseboards.
Start by cutting in the edges then finish with the wide flat areas. When cutting in to the wall use care and a dry brush to minimize paint seeping under the tape.
While brushing wide interior trim begin about 3-4 inches from a corner and brush towards the corner. Then using wide strokes brush in the opposite direction to spread the paint evenly. Start the next area 3-4 inches beyond where you stopped and paint back toward the wet edge.
 Use wide broad strokes with the brush to even out any heavy areas and produce a smooth finish. Work in sections while maintaining a wet edge. Most enamel paint will require two coats. Allow each coat to dry to the touch before proceeding.
After the paint has thoroughly dried, remove the tape and touch-up the walls if necessary. If an excess of paint has built up on the tape edge use a sharp razor knife and carefully cut along this edge prior to removing the tape.


