Cleaning an airless sprayer seems straight forward, but there some important things to think about. Some materials are difficult to clean out, requiring the use of water and a final rinse of hot thinner. How do you change over to another material? Proper storage is another concern. Can you store an airless sprayer with just water in the pump?
These questions, and others, are very important. You spent a lot of money on your airless sprayer; you need to take special care of it.
Type of Material and Reducer Needed
This part is simple. The liquid that is the primary reducer is also used for clean up. The list is water, mineral spirits, lacquer thinner, xylene and denatured alcohol. Some catalyzed finishes have special reducers that must be used, at least for the final rinse.
- Latex and acrylic primers or paints need water for the clean up. This also applies to water based clear wood finishes.
- Alkyd, oil base, primers or paints use mineral spirits (paint thinner).
- Some industrial enamels use xylene as the reducer. These are professional fast drying finishes.
- Lacquer uses lacquer thinner.
- Shellac uses denatured alcohol has the reducer.
Basic Procedure for Cleaning an Airless Sprayer
You will need a couple of clean 5 gallon buckets, a rag or two and a small brass or nylon wire brush. Plus, a clean 1 gallon bucket would be useful.
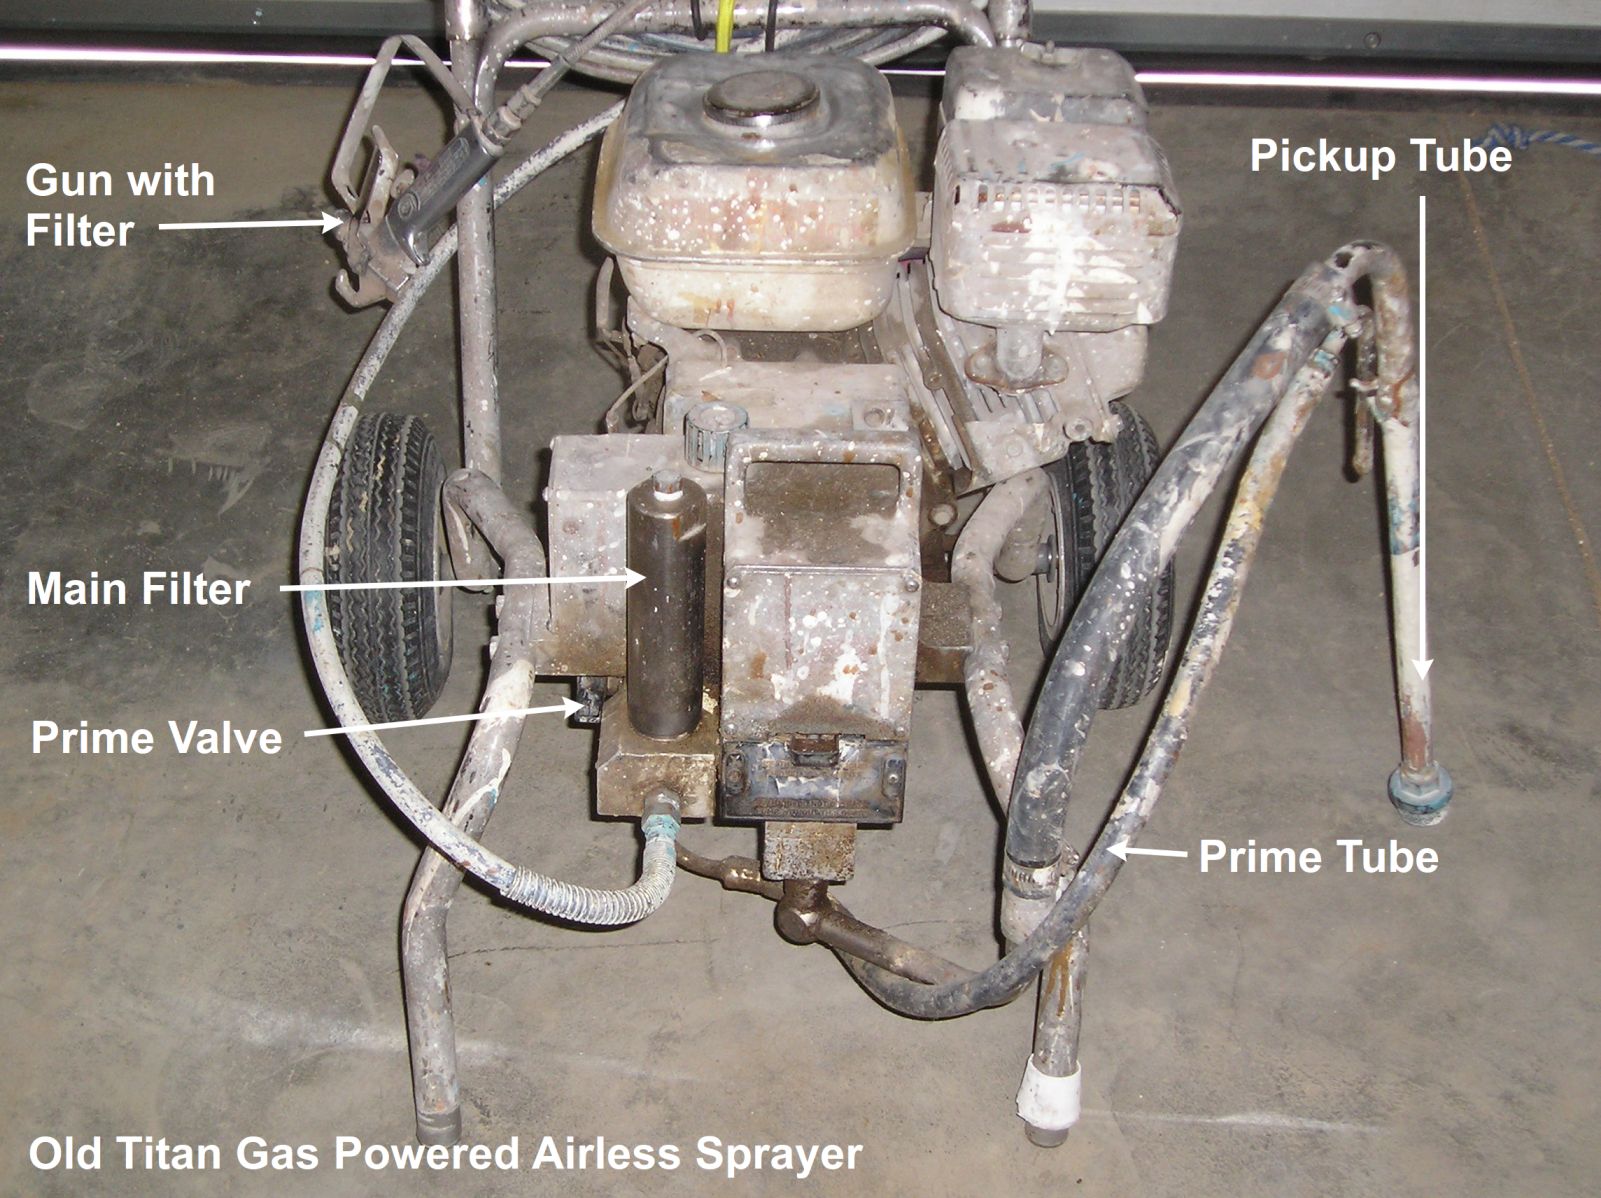
The first thing you need to do is turn down the pressure, all the way to 0, and release the pressure through the prime valve and hose into a bucket. Some manufactures don’t recommend using the prime valve for certain models. For these triggering the gun is recommended. Double check the owner’s manual for the correct way to release the pressure.
The remaining procedures for cleaning an airless sprayer actually depend on the type of material that was sprayed.
Water Based Materials
- Put 4 gallons of water into on of the buckets and have it ready.
- Remove the pickup tube from the material and allow it to drain for a minute or two.
- Remove the course filter from the end of the pickup tube and place into some water. The 1 gallon bucket is good for this.
- Put the pickup tube into the water.
- Remove the tip housing with the tip from the spray gun and place into some water, the 1 gallon bucket.
Now you are ready to pump the water through and push out the paint or material in the pump and hose. Most likely you will need to reprime the pump using the prime valve. Keep the pressure low during this process and through out the cleaning cycle.
Go ahead and pump 3 of the 4 gallons through the sprayer. Now turn everything off, it time to clean off the pickup tube. You can use a stiff putty knife, wire brush or scrub pad to remove any dried on paint and gunk. After this is done rinse out the bucket and replace the dirty water with fresh.
You will need to keep pumping clean water until clear water comes from the gun. Don’t forget to pump 2-3 (or more) gallons through the prime valve and hose.
Now you figure “I have clean water coming out I must be done”, NOPE. You are only halfway there. All of the filters need to be removed and rinsed until clean. Plus the tip needs a good cleaning. Make sure to pump a little clean water through the tip to finish cleaning it.
Some materials are difficult to get out of the pump when cleaning an airless sprayer. These are water based epoxy and elastomeric coatings. To help clean out these materials use dish soap in the last 4-5 gallons of clean water. Warm water also helps.
Solvent Based Materials
The main difference when cleaning an airless sprayer that has solvent based materials in it is the use of solvent. All solvents are expensive and using 15 gallons to clean a pump is not economical. In this case you will need to cycle the solvents.
- Remove the pickup tube from the material and allow it to drain for a minute or two.
- Remove the course filter from the end of the pickup tube and place into some solvent. A 1 gallon bucket is good for this.
- Put the pickup tube into the solvent.
- Remove the tip housing with the tip from the spray gun and place into some solvent, the 1 gallon bucket.
Instead of starting with a large amount of solvent put 1-1/2 gallons into a clean bucket. Push the material out with this solvent. Just as with water you might have to reprime the pump before pumping all the solvent through. Once you reach solvent coming out of the gun continue pump the solvent back into the bucket. Add more solvent if the pump wants to suck air. Keep pumping for about a minute.
Now you have some very dirty solvent. You need another container to hold the dirty solvent. Pump out the solvent and allow the pump to suck a little air. Remove any remaining dirty solvent from the bucket and wipe it with a rag. Now add more clean solvent, about 2 gallons. Pump out the dirty solvent into another container and cycle the new clean solvent into the bucket, cycle for 2-3 minutes.
Keep repeating this procedure until the pump and hose is clean. Don’t forget to push solvent through the prime valve and hose during each cleaning cycle. Now remove all filters and clean them. Reassemble everything and push some solvent through the tip to clean it.
Storing an Airless Sprayer
If you don’t plan on using your sprayer in a day or two you should clean it for storing. Water in the pump can cause rust, some damage if left in it for weeks at a time and will freeze in cold weather. Plus, some “hot” solvents can also cause damage.
There are several pump preserver products on the market. All of them do a good job for winterizing. Another method, used by many contractors, is to use mineral spirits with a little 30wt motor oil. These fluids are for the pump section only.
This is how you do it. If you have water in the pump and hose replace it with straight mineral spirits. Now release the pressure and open the prime valve. All you need is a small amount of engine oil added to some mineral spirits; a quart of mineral spirits and 2-3 table spoons of oil is plenty. Pump this through the prime hose for 30 seconds. It’s also a good idea to add a few drops of throat seal liquid to the cup and rod while it’s pumping. Turn everything off, release any pressure and put the machine away.
4 Responses
Why don’t you hook a air compressor up to the hose and pump and blow out the paint instead of wasting the paint?
Water is needed to remove all paint from the pump and hose. Using air alone would not remove all paint from these surfaces with the pump and hose becoming clogged, very costly to repair.
Unfortunately an inexperienced idiot used my Graco 190es sprayer which we had soaking to clean and he put it back together without the lower packing o ring then he ran enamel & he cleaned it with water I ran thinner through it replaced the filter but it primes but won’t hold pressure my question is if the packing ring is missing will it not hold pressure
You are working with extremely high (potentially dangerous) pressures, ALL seals, packing rings etc MUST be in place as designed by the manufacturer, if not, you will get pressure related problems that sometimes bug you and at other times, could harm you or others around you. ALL pressure products must be 100% maintained – NO OPTION!