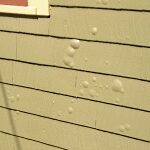
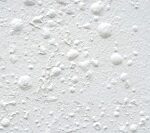
Fixing blistered paint is straight forward with a few differences between interior and exterior surfaces. All affected paint must be removed before applying a new layer of paint.
Fixing Exterior Blistered Paint

For small areas, remove bubbles by scraping then sand the edges of the repair to create a smooth surface. This applies to smooth surfaces with out texture, like smooth wood siding. For rough surfaces, stucco and embossed masonite siding, only scraping and/or wire brushing is possible.
Large areas of damaged finish can be removed by power sanding or hand scraping. Wood surfaces are best taken down to bare wood because old layers of damaged paint are major causes of blistering and peeling.
On masonry, stucco or cinder block, pressure washing can remove the worst paint bubbles quickly, but it’s still a good idea to use a scraper or wire brush to help remove any remaining damage and smooth out the surface.
Fixing Interior Blistering Paint

Scraping is the most effective method of removing blistered paint on walls or ceilings. This damage will need additional steps to finish the repair. NOTE: In most cases it isn’t necessary to remove all of the paint. Concentrate on just the blistered or bubbled areas.
If the current finish is less than 2-3 weeks old scraping could loosen additional paint near the affected spots. Paint applied less than 2-3 weeks ago is uncured and not fully adhered to the surface.
After removing the paint blisters wipe the area with a clean cloth and fresh warm water to remove any residue. Apply a coat of shellac or oil base prime to seal the affected areas. At this point you could just touch-up with paint or go for a more complete repair. To complete the repair use a fast setting drywall mud or other spackling compound to fill the affected areas. Sand the repairs smooth upon drying, and retexture if needed to blend the repair with the surrounding surface.
Priming the Repair
Always remember to prime repairs before painting. Most repairs can receive a good coat of oil based or acrylic primer. On unsealed concrete, use a sealer/primer combo. Look for the words “moisture blocking”, “vapor blocking”, or “vapor barrier” on the label. If mold or mildew has taken hold in a damp environment, remove it. Discolored areas can be treated with a stain-blocking primer once the repairs are complete.
Apply primer and paint according to manufacturer recommendations (not too thick or too thin) and allow adequate drying time. This will help prevent new paint blisters and bubbles from forming. In some cases, this means waiting a full day or more between coats. Read labels if you’re unsure.
Final Thoughts About Fixing Blistered Paint
As you are smoothing and repairing the affected areas, look for clues that might help determine the cause of bubbling. If the surface was previously unpainted, the cause is probably moisture. If fresh paint was applied over existing layers, heat or excessive thinning are likely culprits. Of course, applying paint to a dirty or greasy surface can also cause blistering. Be sure to correct any problems before repainting.
There are several ways moisture can collect and ruin a paint job. A leaky roof, dampness in the basement, or inadequate ventilation needs to be addressed, or problems will recur. Some other potential problems that must be corrected include:
- Vegetation close to the house
- Missing or damaged caulking around windows and doors
- Cracks and gaps in the siding
- Clogged gutters
- Unsealed concrete or block walls


