Many modern homes have rounded corners and painting rounded corners with two different colors can seem very difficult. Fortunately it’s not. These types of corners are called bullnose corners. They are formed by installing a long metal or plastic corner reinforcement that is attached to outside corners.
The corner bead is used to provide a consistent look on the outside corners of the walls that can take a beating.
Here’s a trick we use to get a straight line when painting rounded corners.
First, use blue painter’s masking tape, not the regular blue tape but extended contact painter’s tape. This tape is rated for 30 days and is thinner allowing it to better conform to surface irregularities.
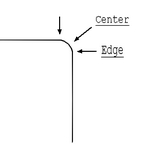
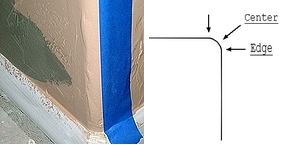
Now choose where to apply the tape. You have both of the edges or the center of the corner. The center will easily split the colors but it is difficult to achieve a good looking “plumb” line. One of the edges is a very good choice. This option will achieve a three dimensional look for one of the paint colors.
Apply the tape from the ceiling down the corner. To do this, attach 1—1-1/2 inches of tape at the ceiling where you want the paint to stop. Carefully pull 1 foot of tape down along the corner matching the same profile, keeping it under tension. Rub the tape from the top to the bottom to form a seal, repeat the process down the bullnose corner.
Pay special attention to the edge of the tape where you will be painting.
Applying the Paint Colors When Painting Rounded Corners
 Since you are working with 2 separate colors, apply the most dominate one first. Wrap this color around the corner, past the point where you want the line between the 2 paint colors.
Allow this coat of paint to dry for several hours, over night is better. The tape has a hard time sticking to fresh paint, so carefully brushing 2 or more thin coats of the new color is better than one thick one.
Check the tape and rub if it has come loose. Chances are some paint will get under the tape but it will have formed a straight line.Once you are satisfied with the coverage of the paint colors remove the tape. Painting rounded corners will require some touch-up after the main painting is through. A steady hand and a good brush will be needed to straighten or fix the line between the different colors.
3 Responses
Here is another suggestion. Since there will almost always be paint bleed under the tape, the first step after taping should be to paint the edge of the tape with the color under the tape (assuming you still have some of that color). You don’t need to go very wide with this – you just need to paint the edge of the tape. This will lock the seam, and any paint bleed will be with the color underneath the tape. Once this is done, there should be no further paint bleed under the tape. Now you can paint the new color. Once it is dried, remove the tape and reveal a perfectly clean line which likely will require no touch-up.
Yes, that’s the correct method. It works perfectly.
Fantastic. Just brought a home and all outside corners are rounded. I wish to paint a few walls as all are white.