Crinkle paper painting: fun, easy, gorgeous results! Crinkle paper painting, or often called tissue paper wall painting, is a decorative painting technique that you’ll fall in love with. This technique gives your walls depth, texture, and interest. You’ll truly transform a room by using this faux painting technique.
Did I mention it’s inexpensive too?
What is crinkle paper painting?
Crinkle paper painting is a faux painting technique achieved by applying layers of crinkled tissue paper to a wall of wet paint, then painting over the tissue paper with another coat of paint. If you’re looking for more of an antique, rich feel, you can apply a glaze over the crinkle paper. Both options offer unique custom results, so let’s learn about both tissue paper painting techniques.
Tools and Materials for Paint and Tissue Paper Technique
- Drop cloth or other floor protection
- Blue painter’s tape
- Several packages of white tissue paper- according to wall size
- Latex paint in your choice of color, eggshell finish works best
- Paint tray
- 3/8″ paint roller
- Chip brush (or a used paintbrush, but be absolutely sure it is clean!)
How-to: Tissue Paper Painting Technique

- Prepare surface. Make sure your wall is clean and free from dust. Wallpaper must be removed. Be sure to tape off trim (or any area you want to protect) with blue painter’s tape. Cover the floor with a drop cloth.
- Prepare tissue paper. Tear a sheet of white tissue paper into approximately four sections. Crinkle tissue paper up with your hands, and lay flat. I recommend tearing and crinkling just one sheet of paper at a time for best results. Tip: Tearing the paper into four pieces is not absolutely necessary, but it’s the method I believe offers the most authentic effect. Also leave some pieces of tissue paper with a hard edge. This will make it easier to fit the tissue along corners and trim.
- Apply base coat of paint. Apply a base coat of paint to the wall with a paint roller. Start at the top left or top right side of your wall and work across in horizontal rows, painting just a small section at a time. Tip: Paint an area just slightly larger than the area the pieces of tissue paper you prepped in Step 2. will cover.
- Apply tissue paper. Apply crinkled tissue paper to the wet paint, smoothing the paper until you like the look. Overlap the sheets of tissue paper by 1/2 to 1 inch. Use your hands and a clean paint brush to spread the paper. Ensure that the entire piece has adhered to the wall. Continue working until you have applied tissue paper to the entire wall. Tip: While the tissue paper is wet, it is very moveable, so feel free to manipulate it as you choose, but be cautious; it will tear easily.
- Apply top coat of paint. Once you’ve applied tissue paper to the entire wall, and you’re satisfied with its placement, use your paint roller to apply the top coat of paint. Tip: The bottom coat doesn’t need to dry before you apply the top coat. You want to sandwich the tissue between the two wet coats of paint.
- Clean edges. Tear off edges of tissue paper where it may have overlapped over molding and wall edges. Tip: If you use the cut edges of the tissue paper along molding and wall edges, you can avoid most of the edge cleaning requirement.
How-to: Glaze and Crinkle Paper Painting Technique
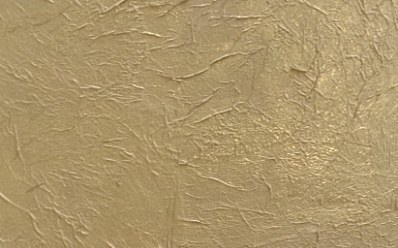
 Glazing your crinkle paper wall produces a dramatic result. As the glaze settles in the crinkles of the tissue paper, it enhances the appearance of texture. When choosing your paint and glaze colors, carefully consider how they will (or won’t) work together. For example, a golden yellow paint would probably be complimented nicely by a bronze colored glaze.
Glazing over tissue paper is accomplished after the paper is installed, either with paint and a solid color or with wallpaper paste. If considering wallpaper paste you will apply the glaze/paint mixture directly to the tissue paper.
- Prepare surface. Prepare surface as you would for the basic crinkle paper painting method.
- Prepare tissue paper. Prepare tissue paper as you would for the basic crinkle paper painting method.
- Apply wallpaper paste. Apply wallpaper paste with a paint roller. Start at the top left or top right side of your wall and work across in horizontal rows, painting just a small section at a time. Tip: Paint an area just slightly larger than the area the pieces of tissue paper you prepped in Step 2. will cover.
- Apply tissue paper. Apply tissue paper as you would for the basic crinkle paper painting method. Let dry. Tip: Be sure wall has dried completely before proceeding to Step 5.
- Apply glaze. Mix glaze (follow manufacturer’s instructions) and pour into a small bucket. Dip sea sponge into the bucket, soak sponge in glaze and then squeeze sponge out. Apply the glaze to wall by making an “X” or “V” with the sponge. Work in small sections, and be gentle so that you don’t tear the tissue paper. Tip: Wear latex work gloves to protect your hands. Note: The coat of glaze will eliminate the need for a top coat of paint.
Tools and Materials for Glaze and Crinkle Paper Painting Technique
- Drop cloth or other floor protection
- Blue painter’s tape
- Several packages of white tissue paper- according to wall size
- Latex paint in your choice of color, eggshell finish works best
- Paint tray
- 3/8″ paint roller
- Glaze in your choice of color
- Sea sponge (natural sponge)
- Small container for glaze
- Chip brush (or a used paintbrush, but be absolutely sure it is clean!)
- Additional glaze color (if desired)
I highly recommend practicing your crinkle paper painting technique on a scrap piece of drywall. Practice crinkling the tissue paper and applying the glaze. This will help you decide whether you prefer crinkling the tissue more or less and whether you want the glaze to be thicker or thinner.
Remember. Paint and glaze color choice can have a big impact on the personality of a room (think dark and dramatic, or bright and cheerful), so I encourage you to think about the “feel” you’re trying to achieve with your crinkle paper painting before you get started.
Either tissue paper paint technique you chose (with or without glaze) will bring interest to an otherwise dull wall within hours.
6 Responses
How easy is it to remove?
Not easy. Once applied and painted over it will take scraping, priming and mudding over with drywall mud to get back to a smooth wall again.
I tried this technique and the tissue paper came off as I applied the top coat of paint. What went wrong?
Possible the paint and tissue was still wet or not fully dry, cured. Or not enough paint was used to glue down the paper.
How do I change the color of the tissue paper wall ? We are remodeling and changing colors. I love the texture just want to change color without removing the tissue.
Just paint over it, regular wall paint. If done correctly it shouldn’t come loose or give you any trouble. Test a spot before proceeding with the entire project.